
Fabric Stencils: Reusable Stencils for DIY Fabric Projects
Transform Plain Textiles into Custom Designs with Professional Stencil Templates
Fabric stencils unlock creative textile customization possibilities transforming plain materials into personalized designs through precise pattern application. These reusable templates enable anyone to create professional-looking artwork on clothing, home decor items, and craft projects without advanced artistic training or expensive equipment.
The accessible technique delivers immediate satisfaction for beginners while offering experienced crafters endless design complexity through layering and color combinations. From refreshing dated cushions to personalizing apparel with unique motifs, quality stencils provide controlled pattern transfer that paint alone cannot achieve. Explore our complete crafts collection for complementary supplies, or discover painting tools like fabric paints that work beautifully with stencil templates.
Understanding Fabric Stencil Applications
Fabric stencils serve as precision tools transferring designs onto textiles through controlled paint or dye application techniques.
The cutout patterns guide coloring agents creating consistent repeatable designs impossible to achieve through freehand painting alone.
Common Fabric Stenciling Uses
Home textile renovation breathes new life into curtains, pillowcases, tablecloths, and bedding through decorative pattern additions.
Clothing customization creates unique apparel designs distinguishing personal style from mass-produced fashion through intentional pattern placement.
Gift personalization adds meaningful touches through monograms, names, or special messages making ordinary items extraordinary keepsakes.
Event decoration produces cohesive themed elements across banners, table linens, and fabric accessories unifying celebration aesthetics.
Creative Possibilities
Border designs along fabric edges add sophisticated finishing touches to plain towels, napkins, and curtains elevating basic textiles.
All-over patterns transform blank canvas into custom wall art, upholstery fabric, or decorative panels showcasing artistic vision.
Strategic placement covers stains or worn areas on favorite garments through decorative patches extending garment life creatively.
Large Reusable Mandala Stencil Set for Fabric Painting
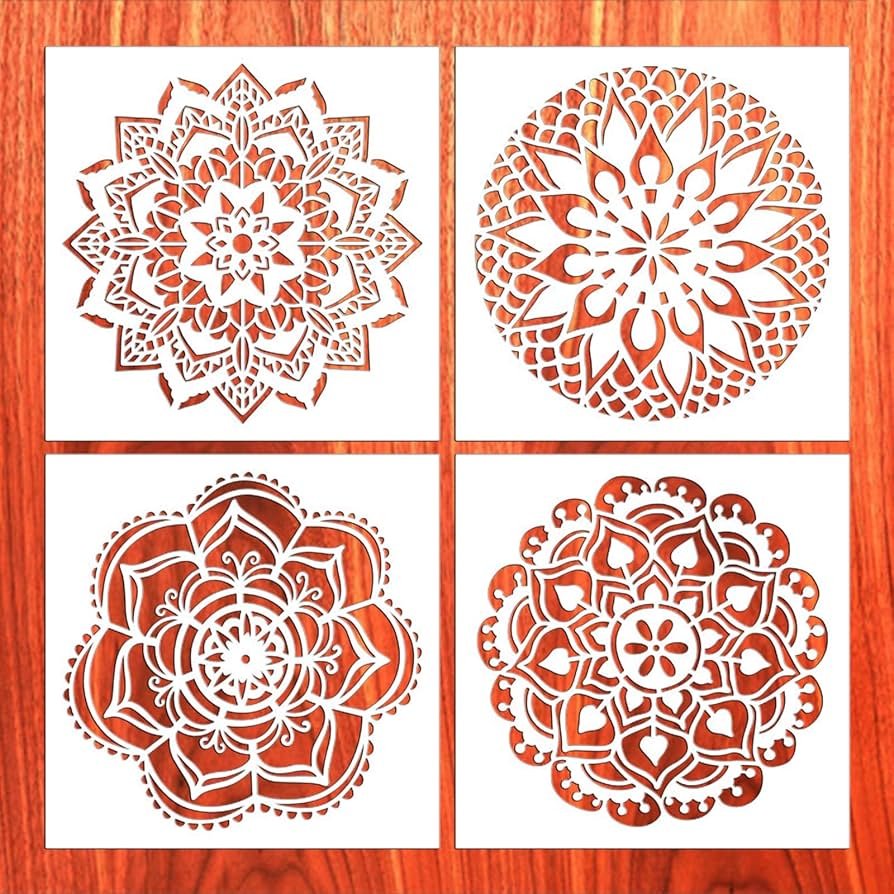
Professional 9-piece mandala stencil collection featuring intricate laser-cut designs perfect for fabric decoration, wall art, furniture refinishing, and floor stenciling. The durable polyester film construction withstands repeated use and washing while generous 12×12 inch sizing accommodates substantial design applications on various surfaces and textiles.
- 9 unique mandala pattern designs included
- Large 12 x 12 inch stencil dimensions
- Durable 0.25mm polyester film construction
- Flexible material conforms to surfaces
- Washable and reusable for multiple projects
- Laser-cut precision for clean pattern edges
- Suitable for fabric, walls, furniture, floors
Selecting Quality Fabric Stencils
Material selection dramatically impacts stencil durability, design precision, and final pattern quality on finished textile projects.
Stencil Material Options
Polyester film stencils offer excellent flexibility conforming to fabric textures while providing durability through dozens of cleaning cycles.
Mylar sheets deliver professional-grade results with precise edges remaining sharp through repeated use on multiple fabric projects.
Acetate provides transparency allowing accurate positioning on patterned fabrics though less durable than polyester alternatives for long-term use.
Freezer paper enables temporary iron-on adhesion creating tight seals preventing paint bleed though designed for single-use applications.
Thickness Considerations
Thicker stencils measuring 0.25mm or greater provide structural stability maintaining shape through aggressive cleaning and repeated applications.
Thinner materials conform better to textured fabric surfaces creating tighter seals that prevent paint seepage under pattern edges.
Balance between durability and flexibility determines optimal thickness based on intended fabric types and project frequency requirements.
Design Complexity
Simple geometric patterns suit beginners providing forgiving application while creating bold visual impact on various fabric types.
Intricate detailed designs require precise paint application and careful stencil handling but produce stunning sophisticated results.
Bridge elements maintain stencil integrity in complex patterns connecting design sections while preserving overall pattern coherence visually.
Essential Stenciling Supplies
Proper tools beyond stencils themselves ensure successful fabric decoration producing professional results worth display and wear.
Paint Selection
Specialized fabric paints formulated for textiles remain flexible after drying preventing cracking during fabric movement or laundering.
Acrylic paints mixed with textile medium transform regular craft acrylics into fabric-suitable formulations expanding available color options.
Spray paint designed for fabric provides even coverage over large areas creating smooth backgrounds or gradient effects quickly.
Application Tools
Stencil brushes with flat stiff bristles enable stippling motion applying paint perpendicular to fabric preventing seepage under edges.
Foam daubers provide controlled paint application for small detailed areas requiring precision without excess paint bleeding.
Paint rollers work beautifully for large simple patterns covering substantial surface areas quickly with consistent even coverage.
Adhesive Solutions
Repositionable spray adhesive applied to stencil backs creates temporary bonds securing templates against fabric during paint application.
Painter’s tape around stencil perimeters holds edges flat preventing lifting that allows paint creeping underneath pattern openings.
Fabric adhesive spray provides another securing option particularly useful for vertical fabric surfaces requiring gravity resistance.
Proper Stenciling Technique
Methodical application process separates amateur results from professional-looking designs worthy of proud display and regular use.
Fabric Preparation
Wash fabrics before stenciling removing sizing or finishes that repel paint preventing proper adhesion to textile fibers.
Press materials smooth using fabric iron eliminating wrinkles that create uneven surfaces disrupting paint application.
Insert barriers between fabric layers preventing paint bleed-through to opposite sides when working on thin materials.
Stencil Positioning
Measure and mark fabric carefully ensuring accurate stencil placement creating balanced compositions across textile surfaces.
Secure stencils firmly against fabric through chosen adhesive method preventing shifting during paint application process.
Check positioning from multiple angles before painting confirming design alignment matches intended final appearance exactly.
Paint Application Method
Load applicators sparingly with paint removing excess on paper towels until tools feel almost dry to touch.
Apply paint using perpendicular dabbing or stippling motion pressing straight down rather than brushing across surfaces.
Work from outside edges toward center building color gradually through multiple light layers rather than single heavy coats.
Stencil Removal
Lift stencils carefully while paint remains wet for cleanest edges unless using freezer paper requiring dried paint before removal.
Peel slowly starting from one corner avoiding smearing wet paint across completed design areas during template withdrawal.
Clean stencils immediately after use preventing dried paint buildup that compromises pattern precision in future applications.
Preventing Paint Bleed
Crisp clean pattern edges define successful stenciling requiring specific techniques preventing paint seepage under template boundaries.
Minimal Paint Application
The single most critical factor involves using barely-damp applicators feeling almost dry before touching fabric surfaces.
Excess paint inevitably seeps under stencil edges regardless of securing methods creating fuzzy imprecise pattern boundaries.
Build color intensity through multiple light applications allowing drying between layers rather than saturating fabric immediately.
Creating Tight Seals
Spray adhesive on stencil backs creates intimate contact between template and fabric preventing gaps allowing paint migration.
Press stencils firmly into textured fabrics ensuring pattern openings make complete contact across uneven textile surfaces.
Use flat-ended stencil brushes applying perpendicular pressure rather than dragging across surfaces spreading paint sideways.
Fabric Texture Management
Heavily textured fabrics present greater bleeding challenges requiring extra care with minimal paint and firm stencil contact.
Consider applying thin fabric glue around stencil edges allowing drying before painting creating additional bleed barriers.
Test techniques on fabric scraps first determining optimal paint consistency and application pressure for specific material types.
Advanced Stenciling Techniques
Mastering basic application opens possibilities for sophisticated effects elevating simple patterns into complex artistic compositions.
Color Layering
Multiple stencils combined create dimensional designs building complexity through sequential applications of different pattern elements.
Allow complete drying between color layers preventing unintended blending unless deliberately creating gradient transition effects.
Work from background to foreground elements building visual depth through strategic color and pattern placement decisions.
Gradient and Ombré Effects
Blend multiple colors on applicators before stenciling creating smooth color transitions within single pattern applications.
Apply paint heavier at design edges fading toward centers producing dimensional shading effects within flat stenciled patterns.
Use progressively lighter or darker color values creating tonal variations that add sophistication to simple geometric designs.
Distressed Vintage Looks
Apply paint unevenly with varied saturation creating worn appearance suggesting age and character in finished designs.
Lightly sand dried heat-set designs removing small paint amounts in strategic locations mimicking natural wear patterns.
Use damp cloths selectively lifting paint from high points on textured fabrics creating dimensional distressed effects.
Creating Custom Stencils
Designing personal stencils enables truly unique projects impossible to duplicate through commercial template purchases alone.
Design Considerations
Start with simple patterns developing cutting skills and design understanding before attempting intricate detailed templates.
Consider island elements requiring bridges maintaining stencil integrity while preserving overall design recognition and visual impact.
Scale designs appropriately for intended fabric items ensuring pattern proportions complement rather than overwhelm textile surfaces.
Hand-Cutting Methods
Print or draw designs on chosen stencil material providing cutting guidelines for manual template creation process.
Use sharp craft knives and precision scissors on cutting mats protecting work surfaces while enabling accurate detail work.
Work from design centers outward maintaining material stability during cutting preventing accidental tearing or distortion.
Digital Cutting Machines
Electronic cutters like Cricut or Silhouette produce precise intricate designs impossible to achieve through manual cutting methods.
Import or create digital designs in machine software adjusting cutting settings for specific stencil material thickness and composition.
Achieve perfect reproductions creating multiple identical stencils enabling consistent pattern application across numerous fabric items.
Pro Tip: Always test stencil and paint combinations on fabric scraps matching project materials before working on actual items. This reveals potential bleeding issues and color appearance allowing technique adjustment preventing costly mistakes on finished pieces.
Stencil Care and Maintenance
Proper cleaning and storage extends stencil lifespan ensuring consistent performance across multiple projects and years of use.
Immediate Cleaning
Clean stencils promptly after each use before paint dries preventing permanent buildup compromising pattern precision over time.
Use damp cloths or baby wipes gently removing wet paint from stencil surfaces without damaging material or pattern edges.
Soft brushes with mild soap tackle stubborn areas without scratching or warping delicate stencil materials during cleaning process.
Deep Cleaning Methods
Soak reusable plastic stencils in warm soapy water loosening dried paint buildup accumulated through multiple project applications.
Rinse thoroughly with clean water removing all soap residue that might interfere with adhesive application in future uses.
Air dry completely on flat surfaces preventing warping that compromises stencil flatness and pattern transfer accuracy permanently.
Proper Storage
Store clean dry stencils flat whenever possible preventing bends or creases that create gaps allowing paint bleed during applications.
Use sheet protectors in hanging files or portfolio folders organizing large stencil collections while protecting from dust accumulation.
Label stencils clearly noting design names enabling quick identification without searching through entire collection unnecessarily.
Fabric Compatibility
Understanding how different textiles accept stenciled designs prevents frustration ensuring appropriate fabric selection for intended patterns.
Ideal Stenciling Fabrics
Cotton fabrics provide optimal surfaces for stenciling accepting paint readily while maintaining pattern clarity through laundering cycles.
Canvas materials offer substantial stability supporting crisp patterns on bags, shoes, and structured home decor items.
Linen’s natural texture adds character to stenciled designs creating organic appearance complementing botanical or rustic pattern choices.
Challenging Materials
Silk and satin slippery surfaces resist stencil adhesion while paint may spread unpredictably requiring specialized techniques or alternative methods.
Stretchy knits distort during application unless properly stabilized preventing pattern accuracy and clean edge achievement.
Heavily textured fabrics allow paint seepage under edges requiring minimal paint application and extra securing pressure during work.
Preparation for Difficult Fabrics
Apply fabric stabilizer sprays or iron-on interfacing before stenciling challenging materials improving surface receptiveness to paint.
Use paint formulations specifically designed for problematic fabric types ensuring proper adhesion and wash durability after heat-setting.
Test extensively on scraps determining whether direct stenciling proves viable or alternative decoration methods suit materials better.
Heat-Setting and Finishing
Proper finishing techniques transform temporary decorations into permanent washable designs surviving regular clothing use and laundering.
Heat-Setting Process
Allow designs complete drying for 24 hours minimum before heat-setting ensuring paint fully cures preventing smearing during heat application.
Place pressing cloth over stenciled areas protecting designs from direct iron contact that might damage or melt certain paint formulations.
Apply heat at appropriate fabric temperature settings for 2-3 minutes activating chemical bonding between paint and textile fibers.
Washing Guidelines
Wait 72 hours after heat-setting before first wash allowing complete chemical bonding ensuring maximum design permanence and durability.
Turn stenciled items inside out before laundering reducing direct friction on decorated surfaces extending design life significantly.
Use cold water on gentle cycles with mild detergents avoiding harsh chemicals accelerating color fading over repeated washings.
Professional Finishing Touches
Use fabric markers sharpening design edges or adding fine details impossible to achieve through stencil application alone.
Apply thin textile medium layers over completed designs providing additional protection against abrasion during regular use and washing.
Combine stenciling with embroidery, beading, or fabric gems creating mixed-media dimensional artwork exceeding single-technique limitations.
Frequently Asked Questions
Yes, creating custom fabric stencils at home is straightforward using materials like Mylar sheets, acetate, or freezer paper. Hand-cut designs using craft knives on cutting mats or use electronic cutting machines like Cricut for precise intricate patterns. Start with simple designs developing skills before attempting complex templates requiring detailed cutting and bridge element planning.
Specialized fabric paints formulated for textiles work best remaining flexible after drying preventing cracking during wear or washing. Acrylic paints mixed with textile medium provide expanded color options while maintaining fabric-suitable properties. Always heat-set according to manufacturer instructions ensuring permanent washable results that survive regular laundering and use.
Prevent bleeding by using minimal paint on almost-dry applicators, securing stencils firmly with spray adhesive, and applying paint with perpendicular stippling motion rather than brushing across. Build color through multiple light layers allowing drying between applications. Test on fabric scraps first determining optimal paint consistency and application pressure for specific materials.
Quality fabric stencils made from polyester film or Mylar are highly reusable lasting through dozens of projects when properly cleaned and stored. Clean stencils immediately after use before paint dries, store flat to prevent warping, and handle carefully avoiding tears or damage. Freezer paper stencils are designed for single-use while plastic templates provide long-term value.
Yes, fabric stencils work on dark fabrics using opaque paint formulations designed for high visibility on dark backgrounds. White, metallic, and neon colors show best on dark textiles. Consider applying light base layer first then adding colored details on top for improved visibility. Test color appearance on fabric scraps ensuring satisfaction before working on actual projects.
Properly heat-set stenciled designs using quality fabric paints last for years surviving dozens of wash cycles with minimal fading. Longevity depends on paint quality, correct heat-setting, and gentle care practices including cold water washing and inside-out laundering. Professional-grade materials and techniques produce designs lasting the lifetime of the garment or textile item.
Cotton and canvas fabrics work best for stenciling providing stable absorbent surfaces that accept paint readily while maintaining pattern clarity. Linen offers excellent results with natural texture adding character. Avoid very stretchy knits, slippery silk, or heavily textured materials unless using specialized techniques and stabilizers. Always test on fabric scraps before working on finished items.
Related Resources
- Crafts Collection – Complete crafting supplies and materials
- Fabric Paints for T-Shirts – Specialized textile painting supplies
- Spray Paint – Coverage for large stencil projects
- Fabric Adhesive – Stencil securing solutions
- Fabric Irons – Heat-setting equipment
- Fabric Glue – Alternative adhesive options
- Fabric Markers – Detail and finishing tools
- Fabric Scissors – Precision cutting tools
- Fabric Gems – Decorative embellishments
- Fabric Collection – Complete textile selection
- Canvas Fabric – Ideal stenciling material
- Letter Stickers – Alternative text application
- Sewing Supplies – Complete sewing materials
- Return to Homepage
Transform Textiles with Fabric Stencils
Fabric stencils provide accessible entry into textile customization enabling anyone to create professional-looking designs on clothing, home decor, and craft projects without specialized training. The reusable templates deliver consistent precise patterns through controlled paint application while offering endless creative possibilities through color combinations and layering techniques.
Master proper stenciling methods including surface preparation, minimal paint application, and heat-setting procedures ensuring designs survive regular wear and laundering cycles. Quality materials combined with patient technique produce crisp clean patterns transforming ordinary fabrics into personalized artistic expressions worthy of proud display throughout homes and wardrobes.
Ready to begin your fabric stenciling journey? Explore our complete crafts collection for essential supplies and materials, or discover fabric paints formulated specifically for textile decoration ensuring permanent washable results in every creative project you undertake.