
Fabric Eyelet Punch: Complete Guide to Tools and Techniques for Professional Results
Manual, Plier-Style, and Heavy-Duty Eyelet Punches for Fabric, Leather, Canvas, and DIY Projects
Fabric eyelet punches create reinforced holes in textiles by installing metal rings that prevent fraying and tearing while adding professional hardware connections. These specialized tools work on materials ranging from lightweight cotton to heavy leather, delivering durable openings that withstand years of stress and repeated use.
Understanding eyelet punch types and proper installation techniques ensures clean results on everything from decorative clothing details to functional curtain headers. The complete tool sets include hole-cutting components and setting mechanisms making permanent eyelet installation accessible without expensive professional equipment.
Understanding Fabric Eyelet Punch Tools
Fabric eyelet punches combine cutting and setting functions to install metal rings around fabric holes preventing damage from tension and use. The two-piece eyelets consist of a barrel inserted through material and a backing that compresses creating permanent reinforcement.
Key Tool Components
Standard eyelet punch sets include hole cutters for precise openings, setting tools that compress eyelet pieces together, and bases providing stable surfaces during installation. Quality kits contain multiple eyelets in various sizes ensuring adequate supply for complete projects without additional purchases.
Manual punch tools require hammer strikes to set eyelets offering portability without power requirements. Plier-style options use hand pressure applying consistent force without noise making them ideal for apartment crafting or small batch work.
Eyelet vs Grommet Differences
Eyelets measure under 1/2 inch diameter using one-piece construction suited for decorative applications on clothing and light fabrics. Grommets exceed 1/2 inch featuring two-piece designs with washers providing structural strength for tarps and heavy-duty applications.
The distinction affects tool selection since eyelet punches handle delicate precision work while grommet tools apply greater force for thick materials. Choosing appropriate hardware prevents installation failures and material damage requiring costly rework.
Selecting the Right Eyelet Punch
Choosing appropriate eyelet punches depends on material thickness, project frequency, and required hole sizes. Understanding these factors ensures optimal performance without purchasing incompatible tools or inadequate supplies.
Manual Punch Options
Traditional manual eyelet punches require hammer strikes to compress eyelets through fabric offering affordability and reliability. These tools work excellently for occasional projects and provide superior control during installation without batteries or electrical connections.
Heavy-duty manual sets handle thick materials including leather and canvas fabric that lighter tools cannot penetrate. The robust construction withstands repeated hammer impacts delivering consistent results across demanding applications.
Plier-Style Convenience
Eyelet pliers combine hole-punching and setting functions into single hand-operated tools eliminating hammer requirements. The lever action applies even pressure producing quiet operation perfect for crafters in shared spaces or noise-sensitive environments.
These ergonomic options prove valuable for frequent small projects reducing physical strain compared to traditional hammer methods. Limited thickness capacity restricts plier punches to lightweight and medium-weight fabrics unsuitable for heavy materials.
Size Considerations
Small eyelets measuring 1/8 to 3/16 inch suit delicate work on thin fabrics and decorative clothing applications. Medium sizes ranging 1/4 to 5/16 inch accommodate most general projects including fabric bags and home décor items requiring functional reinforcement.
Large eyelets exceeding 3/8 inch transition into grommet territory serving heavy-duty applications. Selecting appropriate sizing ensures eyelets distribute stress adequately without appearing oversized for delicate projects or undersized for load-bearing applications.
Mudder 301 Piece Grommet Eyelet Pliers Kit
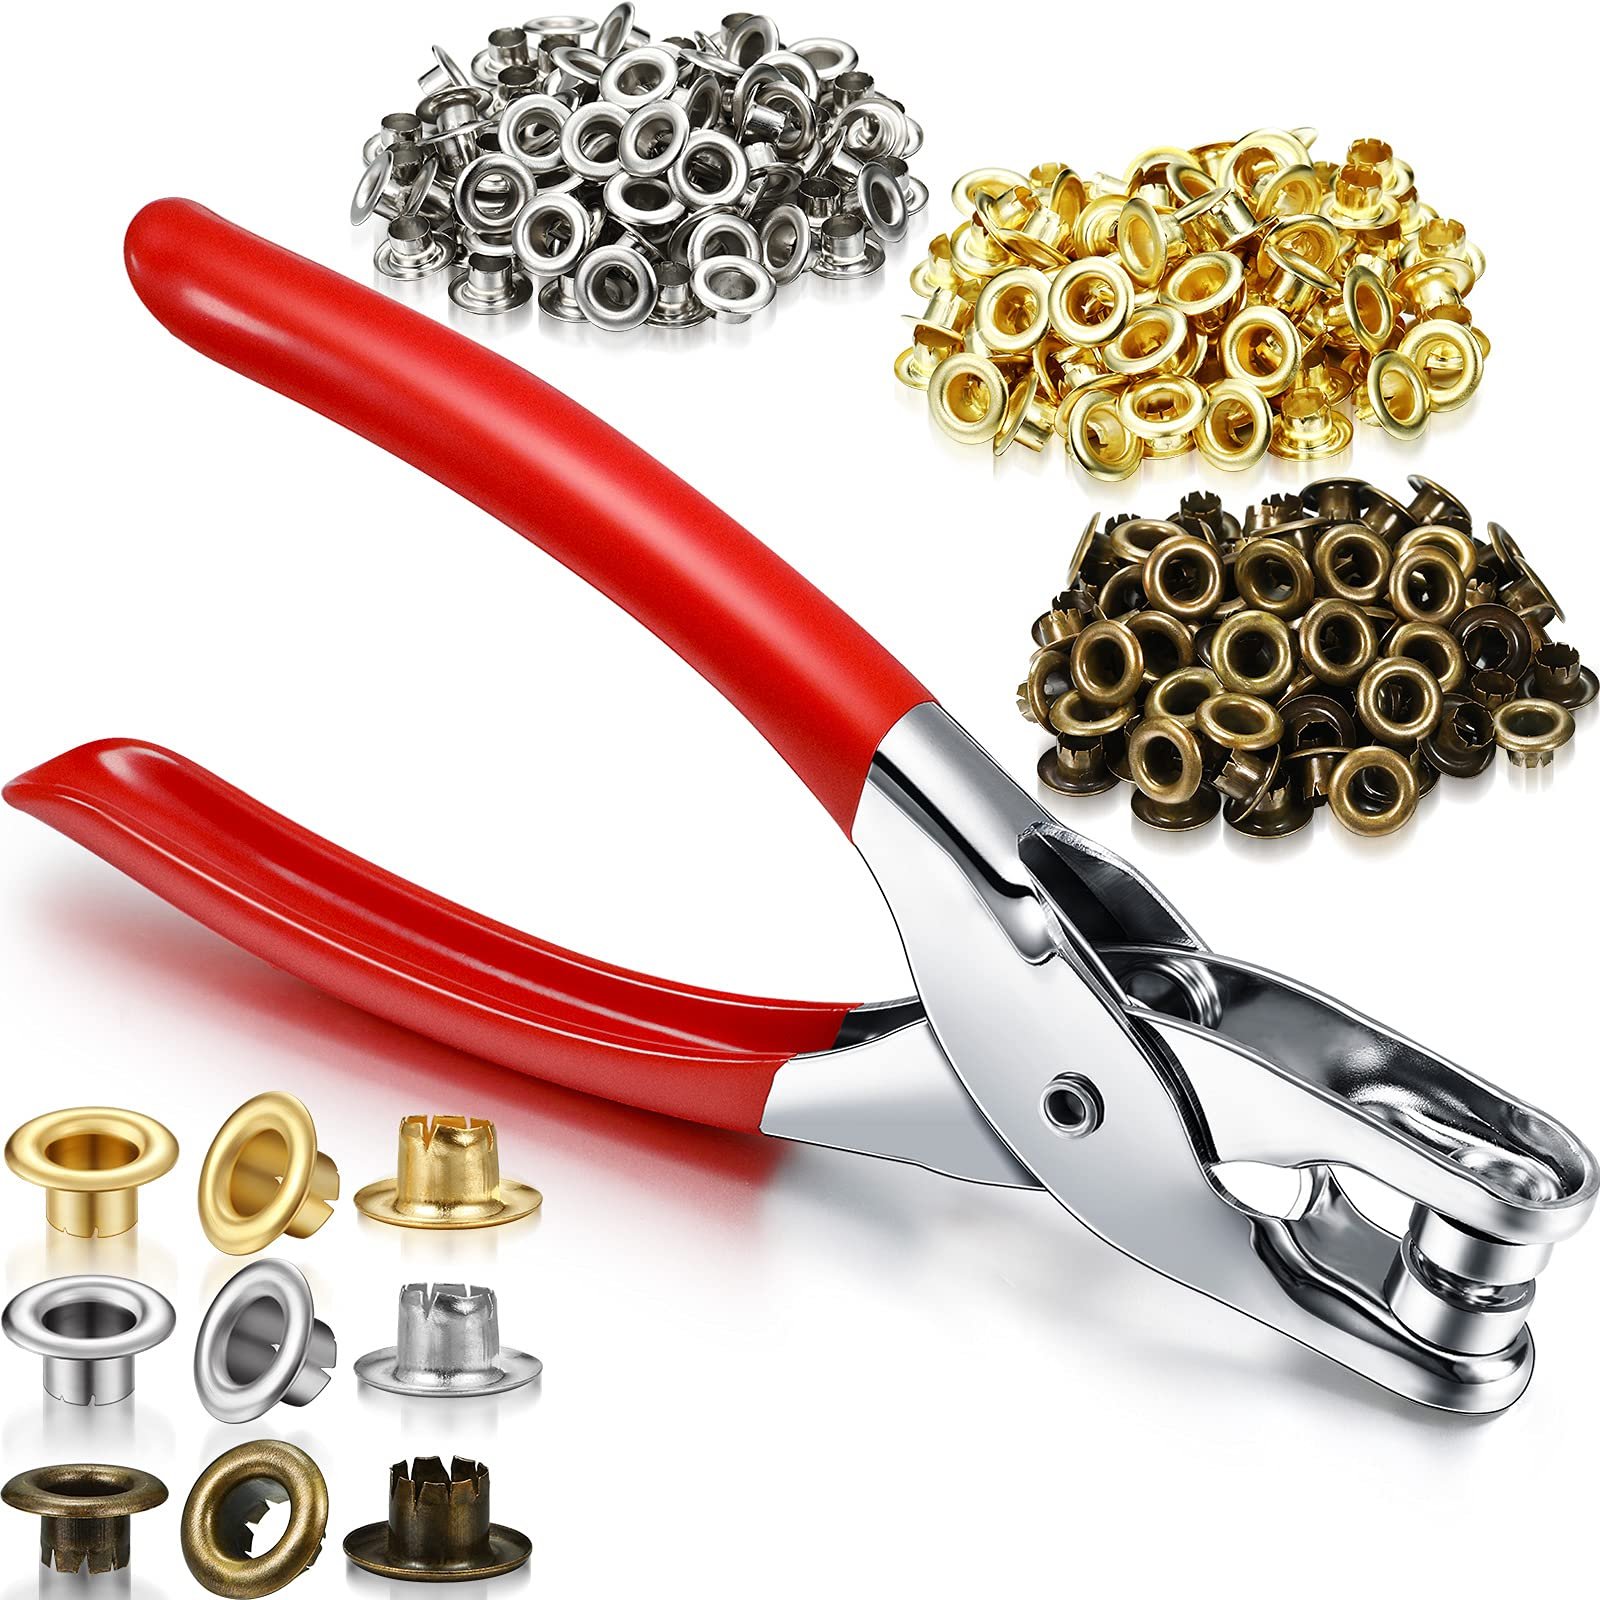
Comprehensive 301-piece eyelet pliers kit featuring 1/4 inch bronze metal eyelets perfect for fabric, leather, belts, shoes, and clothing applications with ergonomic hand-press design. This complete tool set includes eyelet punch pliers with 300 metal eyelets and washers providing extensive supply for multiple projects eliminating frequent restocking needs. The plier-style design eliminates hammer requirements delivering quiet, controlled eyelet installation ideal for apartment crafters or those preferring less strenuous setting methods compared to traditional manual tools.
- 301 total pieces included
- 300 bronze metal eyelets
- 1/4 inch (6mm) size
- Hand press plier design
- No hammer required
- Works on fabric and leather
- Ergonomic operation
- Quiet installation process
Proper Eyelet Installation Technique
Achieving professional eyelet installations requires accurate hole cutting and correct compression pressure. Practicing on scrap material before working final projects builds confidence and reveals how different fabrics respond to eyelet setting.
Preparation Steps
Mark eyelet placement using fabric chalk or fabric pencil ensuring even spacing and accurate positioning. Precise marking prevents uneven appearance and ensures functional placement for intended purposes like curtain rod insertion or strap attachment.
Reinforce lightweight fabrics with fusible interfacing or additional fabric layers preventing tear-through under stress. Apply reinforcement to fabric wrong side before marking positions strengthening material structure without visible bulk on finished projects.
Cutting Clean Holes
Position fabric on stable cutting surface using self-healing mat or wood block protecting underlying work areas. Center hole cutter precisely over marked location applying firm downward pressure while twisting to create clean openings without ragged edges.
Check hole size before proceeding ensuring eyelet barrel passes through easily without forcing. Holes too small cause fabric bunching while oversized openings reduce eyelet security and compromise professional appearance requiring replacement.
Setting Eyelets Securely
Place backing piece on anvil with fabric positioned over it aligning material hole with backing opening. Insert eyelet barrel through fabric hole from top side ensuring proper orientation with rim facing upward for correct compression.
Position setter tool over eyelet barrel applying even downward pressure while striking with hammer for manual tools. Plier-style tools require firm squeezing until eyelet compresses fully around backing creating secure connection without gaps.
Verify installation by gently tugging fabric around eyelet checking for movement or separation. Properly set eyelets remain firmly attached without looseness indicating successful compression through all material layers.
Working with Different Materials
Various fabric types require specific approaches when installing eyelets ensuring optimal results. Understanding material characteristics prevents common mistakes and delivers professional installations across textile varieties.
Lightweight Fabric Considerations
Thin materials measuring under 2mm thickness require extensive reinforcement before eyelet installation preventing tear-through. Use fusible interfacing, fabric doubling, or specialized patches strengthening areas receiving hardware without adding excessive bulk.
Apply liquid fray preventer around marked holes before cutting preventing fiber separation. Allow products to dry completely before proceeding with hole cutting ensuring maximum fabric stabilization around eyelet locations.
Heavy Material Techniques
Thick fabrics including denim, canvas, and outdoor fabric require appropriate eyelet barrel length to penetrate material adequately. Standard eyelets designed for thin materials fail to grip thick fabrics properly requiring specialized longer-barrel options.
Pre-cut pilot holes using sharp fabric scissors or leather punches when working extremely thick materials. This preparation reduces force required during eyelet setting preventing tool damage and improving installation success rates.
Leather and Synthetic Approaches
Leather requires specialized consideration when installing eyelets due to material density and natural oils. Use dedicated leather punches creating clean holes before eyelet insertion ensuring proper sizing without stretching or tearing the hide.
Synthetic materials including polyester and nylon accept eyelets successfully though slick surfaces sometimes require extra care during installation. Light sanding or roughening around marked areas improves eyelet grip preventing rotation under stress.
Pro Tip: Always test your eyelet punch on scrap fabric matching your project material before installing eyelets on final pieces. This practice reveals proper pressure requirements and identifies any material compatibility issues preventing costly mistakes on finished work.
Common Installation Problems
Understanding how to address eyelet installation issues saves projects from failure and builds confidence. Most problems have simple solutions when identified early in the process.
Preventing Loose Eyelets
Eyelets that rotate or pull loose typically indicate insufficient compression during installation or holes cut too large. Remove faulty eyelets carefully using pliers separating components without excessive fabric damage then reinstall with proper technique.
Apply firm, complete pressure when setting replacement eyelets ensuring full compression around all edges. Undersized holes prevent proper eyelet seating while correct sizing allows smooth barrel insertion with adequate material contact.
Avoiding Fabric Damage
Material puckering around eyelets indicates holes cut too small for eyelet barrel diameter. Enlarge undersized openings carefully using sharp scissors or appropriate cutting tools before attempting reinstallation preventing continued bunching.
Torn fabric around eyelet locations suggests insufficient reinforcement or installation too close to edges. Maintain minimum 1-inch distance between eyelet edges and fabric boundaries ensuring adequate material for secure grip under stress.
Tool Maintenance
Keep cutting dies sharp by storing in protective cases preventing edge damage from contact with other tools. Dull cutters create ragged holes requiring excessive force that may damage both fabric and equipment.
Clean setting tools regularly removing accumulated debris or metal particles interfering with proper compression. Apply light oil to moving parts on plier-style tools maintaining smooth operation through extended use.
Popular Eyelet Punch Projects
Fabric eyelet punches enable countless creative applications ranging from functional improvements to decorative enhancements. Professional-looking hardware elevates simple fabric work into polished finished products.
Curtain and Drapery Applications
Create custom grommet-top curtains with evenly spaced eyelets allowing smooth rod sliding. Space eyelets 6-8 inches apart across panel width calculating placement that accommodates desired fullness and gathering effect.
Update existing curtains by adding eyelets to outdated pleated styles creating contemporary hardware-mounted designs. This budget-friendly refresh transforms window treatments without purchasing new panels or complicated alterations.
Fashion and Clothing Details
Add decorative eyelets to garments creating trendy lace-up details on sleeves, backs, or sides. The hardware elements transform basic clothing into fashion-forward pieces following current style trends popular in contemporary design.
Install functional eyelets for belt holes, shoe laces, or adjustable straps providing customization without traditional sewing. The durable metal hardware withstands repeated adjustments and daily wear better than fabric alternatives.
Bag and Accessory Hardware
Design custom tote bags incorporating eyelets for strap attachment or decorative elements. Professional hardware elevates handmade bags to quality comparable with purchased accessories showcasing expert craftsmanship.
Create adjustable features using eyelets for size customization without complicated buttonholes. Position hardware away from stress points where handles attach avoiding concentrated forces that cause premature failure.
Character Fabric Projects
Plan eyelet placement on printed fabrics like Harry Potter fabric or Marvel fabric avoiding key design elements. Strategic positioning preserves character images while providing necessary hardware functionality for bags, curtains, or accessories.
Use coordinating eyelet finishes that complement printed fabric colors enhancing rather than distracting from designs. Bronze, silver, or gold eyelets accent themed fabrics when thoughtfully matched to dominant colors or character details.
Eyelet Punch Kit Options
Comprehensive eyelet punch kits provide all necessary components for successful installations saving money compared to purchasing items separately. Complete sets ensure tool compatibility and adequate supplies for project completion.
Beginner-Friendly Kits
Starter eyelet kits include basic plier-style tools with assorted eyelets perfect for learning proper techniques. These affordable options provide everything needed for initial projects without overwhelming beginners with excessive options.
Look for kits containing multiple eyelet sizes allowing experimentation across different project types. Variety enables crafters to discover preferred sizes and applications before investing in specialized tools.
Professional Tool Sets
Heavy-duty eyelet kits feature robust manual punches with interchangeable dies accommodating various sizes. These comprehensive options handle demanding projects and frequent use delivering consistent professional results across material types.
Premium sets include specialized components like extended barrel eyelets for thick materials and multiple finish options. Investment in quality kits pays dividends through superior performance and extended tool life compared to budget alternatives.
Storage and Organization
Store eyelet punches with other sewing supplies including pressing tools and cutting boards for efficient project setup. Dedicated storage prevents tools from becoming scattered or damaged between uses.
Organize eyelets by size and finish in labeled containers preventing confusion during assembly. Clear organization systems save time and frustration when working on multiple concurrent projects requiring different hardware.
Repairing Damaged Eyelets
Removing and replacing damaged eyelets extends item lifespan saving money compared to purchasing replacements. Proper repair techniques restore functionality while maintaining or improving original appearance.
Removal Process
Carefully pry up damaged eyelet edges using small flathead screwdriver working around entire circumference. Pull separated components away from fabric using pliers avoiding excessive force that tears surrounding material.
Alternatively cut eyelet barrel with wire cutters when prying proves difficult or risks fabric damage. Remove any deformed material remnants ensuring clean area for replacement eyelet installation.
Fabric Repair Steps
Inspect fabric around removed eyelet checking for tears or excessive fraying requiring attention. Apply small matching fabric patch or interfacing to damaged areas reinforcing before installing new hardware.
Consider using slightly larger replacement eyelets when fabric shows wear around original hole. Increased diameter captures fresh material outside damaged zone providing secure attachment without stress on weakened areas.
Upgrade Opportunities
Replace worn plastic eyelets with durable metal alternatives improving longevity and appearance. Metal hardware resists cracking and discoloration outlasting plastic options particularly in outdoor or high-stress applications.
Update finishes during repair choosing colors that better complement current décor or fashion trends. Bronze, brass, or colored eyelets transform dated items into refreshed pieces reflecting contemporary style preferences.
Safety and Best Practices
Using eyelet punches responsibly includes attention to safety procedures and proper techniques. Following recommended practices protects users and project materials from damage.
Safe Tool Operation
Wear safety glasses when striking manual punch tools with hammers protecting eyes from metal fragments or debris. Flying particles pose serious injury risk particularly when setting eyelets in resistant materials.
Keep fingers clear of compression zones during eyelet setting avoiding pinching or crushing injuries. Hand-press tools exert significant force that can cause serious damage if fingers get caught between moving components.
Work on stable surfaces providing adequate support during installation preventing tools from slipping. Unstable work areas increase accident risk and produce poor-quality installations requiring rework.
Material Handling
Use sharp cutting tools carefully maintaining control during hole-punching operations. Dull tools require excessive force increasing slip risk and producing ragged holes compromising installation quality.
Support fabric adequately during eyelet installation preventing material shift causing misalignment. Use fabric clips or weights securing materials maintaining precise positioning throughout installation process.
Child Supervision
Supervise children closely when using eyelet punches ensuring proper tool handling and technique. Sharp cutting implements and compression tools pose injury risks requiring adult oversight during all phases.
Consider plastic eyelet options for children’s projects when appropriate eliminating sharp metal edges. Snap-together plastic eyelets often install without tools making them safer alternatives for supervised young crafters.
Frequently Asked Questions
Fabric eyelet punches install metal rings around holes in textiles preventing fraying and tearing while providing reinforced openings. Common applications include curtain headers, clothing details, bag strap attachments, and decorative elements on various projects. The tools work on materials ranging from lightweight cotton to heavy leather creating durable holes that withstand stress and repeated use better than simple cut openings.
Traditional manual eyelet punches require hammer strikes to compress eyelets through fabric though plier-style options eliminate hammering through hand-operated lever action. Plier punches work excellently for lightweight to medium fabrics offering quiet operation ideal for apartments or small spaces. Heavy-duty materials and thick leather typically need traditional hammer-and-die sets providing sufficient force for proper compression through dense materials.
Yes, eyelet punches work on leather though heavy-duty tools and proper technique prove essential for success. Pre-cut pilot holes using dedicated leather punches before eyelet insertion reducing force required and preventing tool damage. Standard lightweight eyelet pliers struggle with leather thickness requiring manual punch-and-hammer sets or professional-grade tools designed specifically for dense materials like hides and thick canvas.
Prevent fraying by applying fusible interfacing to fabric wrong side before punching holes providing structural reinforcement. Liquid fray preventers applied to marked areas and allowed to dry completely before cutting also stabilize fibers around openings. Use sharp cutting tools creating clean holes rather than tearing fibers and select eyelet sizes large enough to completely capture raw edges preventing exposure that leads to unraveling.
Curtain eyelets typically measure 1/4 to 3/8 inch inner diameter depending on curtain rod thickness and desired aesthetic. Standard curtain rods require minimum 3/8 inch eyelets allowing smooth sliding without binding while smaller decorative rods may accept 1/4 inch hardware. Measure your curtain rod diameter and select eyelet inner diameter at least 1/8 inch larger ensuring easy movement without excessive gaps around the rod.
Remove damaged eyelets by carefully prying up folded edges using small flathead screwdriver working around entire circumference then pulling apart with pliers. Alternatively cut eyelet barrel with wire cutters when prying risks fabric damage then remove separated components. Clean installation area removing deformed material remnants before installing replacement eyelets slightly larger than originals if fabric shows wear around holes.
Comprehensive eyelet punch kits provide excellent value including tools and assorted eyelets at lower cost than purchasing items separately. Complete sets ensure component compatibility eliminating mismatched parts that prevent proper installation. Kits prove especially worthwhile for crafters planning multiple projects or wanting flexibility to experiment with different sizes before committing to specialized single-size tools and hardware.
Related Resources
- Grommet Kit – Heavy-duty hardware
- Fabric Scissors – Precision cutting tools
- Fabric Chalk – Marking and placement
- Fabric Pencil – Precision marking
- Fabric Clips – Material securing
- Fabric Iron – Interfacing application
- Canvas Fabric – Heavy materials
- Outdoor Fabric – Weather-resistant projects
- Fabric Bags – Project applications
- Harry Potter Fabric – Character prints
- Marvel Fabric – Licensed materials
- Fabric Ribbon – Decorative accents
- Cutting Boards – Work surfaces
- Sewing Machines – Complementary equipment
Create Professional Hardware Installations
Fabric eyelet punches provide essential tools for installing reinforced metal rings in textiles delivering professional results impossible to achieve without proper equipment. The specialized components create durable installations that withstand years of use while maintaining clean, finished appearance across diverse applications.
Whether adding decorative details to clothing, creating functional curtain headers, or repairing damaged items, quality tool selection and proper technique ensure maximum durability. Understanding eyelet sizing, material requirements, and installation procedures guarantees successful projects worth the creative investment.
Start your eyelet projects with appropriate punch tools, proper marking supplies for accurate placement, and adequate reinforcement materials to transform basic fabric work into professional finished products showcasing expert craftsmanship and attention to detail.