
Fabric Patch: Complete Guide to Repairing and Decorating with Iron-On and Sew Patches
Iron-On Patches, Sew-On Repairs, and Creative Fabric Patching for Jeans, Clothing, and DIY Projects
Fabric patches transform damaged clothing into renewed favorites while adding creative flair to plain garments through decorative applications. These versatile repair tools extend garment life significantly, covering tears and worn areas with durable materials that withstand regular wear and washing when properly applied.
Understanding the differences between iron-on and sew-on patches helps you choose the right application method for your specific fabric and project requirements. Whether repairing children’s jeans or customizing jackets with artistic designs, proper patching techniques ensure professional results that last.
What Makes Fabric Patches Essential
Fabric patches serve dual purposes as functional repairs and creative embellishments, offering sustainable alternatives to discarding damaged clothing. The reinforced materials distribute stress around damaged areas preventing further tearing while creating opportunities for personal expression through color and design choices.
Modern patches evolved from necessity-based repairs into fashion statements, combining practicality with artistic potential. From quick iron-on fixes to elaborate hand-stitched designs, patches accommodate various skill levels and aesthetic preferences while promoting clothing longevity.
Iron-On vs Sew-On Options
Iron-on patches feature heat-activated adhesive backing that bonds to fabric without sewing, offering quick application for immediate results. These convenient options work best on smooth, tightly woven fabrics like cotton and cotton blends where high heat application poses no damage risk.
Sew-on patches require manual stitching but provide superior durability especially for high-friction areas including knees and elbows. The permanent thread attachment withstands repeated washing and wear better than adhesives, making sewn patches ideal for heavy-duty repairs and items requiring frequent laundering.
Patch Material Selection
Cotton patches offer breathability and comfort for clothing repairs, matching well with natural fiber garments including jeans and casual wear. These versatile materials accept both iron-on adhesives and sewing methods while providing adequate strength for most everyday repair needs.
Denim patches suit heavy-duty applications requiring extra reinforcement, particularly for repairing workwear or reinforcing stress points. The robust material withstands abrasion and repeated strain making it perfect for knee and elbow patches on frequently worn items.
Choosing the Right Fabric Patch
Selecting appropriate patches depends on fabric type, damage location, and intended use ensuring repairs remain secure through regular wear. Matching patch weight to garment weight prevents bunching while coordinating colors either blends repairs invisibly or creates intentional design statements.
Size and Shape Considerations
Small patches measuring 3-4 inches work well for minor tears and decorative accents on pockets or sleeves. These compact sizes provide adequate coverage for common clothing damage while remaining proportional to garment sections without overwhelming design elements.
Large patches exceeding 6 inches handle extensive damage or create bold fashion statements on fabric bags and outerwear. Oversized patches require careful positioning ensuring they extend beyond damaged areas adequately while maintaining garment flexibility and comfort.
Color Matching Strategies
Matching patch colors to original fabric creates subtle repairs that blend seamlessly with existing garment appearance. This approach works best for professional clothing or items where repairs should remain inconspicuous maintaining polished aesthetics.
Contrasting patches make bold design statements transforming necessary repairs into intentional style elements. Bright colors on character fabrics or patterned materials create custom looks that celebrate visible mending as artistic expression.
Fabric Compatibility
Natural fiber garments including cotton, linen, and canvas fabric accept iron-on patches readily when heat settings match material requirements. The absorbent structures allow adhesives to penetrate effectively creating secure bonds that withstand normal wear cycles.
Synthetic materials like polyester and nylon require lower heat settings preventing melting or scorching during iron-on application. Test patch adhesion on inconspicuous areas first ensuring temperature compatibility before applying patches to visible garment sections.
Multi-Colored Iron-On Fabric Repair Patches
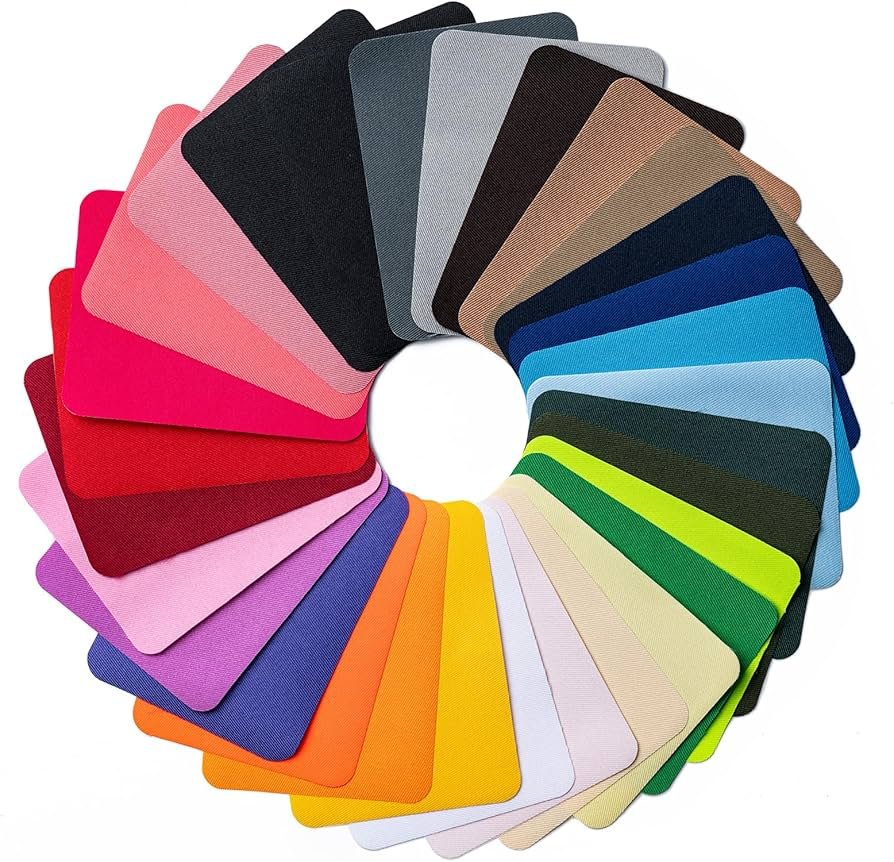
Comprehensive 30-piece iron-on patch set featuring 29 color shades in 3.7 x 4.9 inch dimensions perfect for jeans, shirts, and clothing repairs requiring versatile color matching. These premium cotton patches include heat-activated adhesive backing allowing quick application without sewing skills, with easily customizable sizing through simple cutting for varied repair needs. The multi-colored selection ensures perfect matches for different garments while the generous dimensions provide adequate coverage for common tears and worn areas in everyday clothing items.
- 30 pieces in 29 color shades
- 3.7 x 4.9 inch standard size
- 100% cotton construction
- Heat-activated adhesive backing
- Easily customizable by cutting
- No sewing skills required
- Perfect for jeans and shirts
- Machine washable after application
Iron-On Patch Application
Successful iron-on patching requires proper surface preparation and correct heat application ensuring maximum adhesive bond strength. Clean fabric areas thoroughly removing dirt, oils, or detergent residue that interfere with adhesive performance before beginning application process.
Surface Preparation Steps
Wash and dry garments completely before applying iron-on patches removing any substances that prevent adhesive contact with fabric fibers. Position items on firm, heat-resistant surfaces like ironing boards avoiding soft or uneven areas that reduce heat transfer efficiency.
Mark patch placement using fabric chalk or fabric pencil ensuring accurate positioning before heat application. For hole repairs, extend patches at least half-inch beyond damage in all directions providing adequate reinforcement around weakened areas.
Heat Application Technique
Set irons to appropriate temperatures for fabric types, typically cotton or linen settings without steam which interferes with adhesive activation. Place pressing cloths over patches protecting decorative surfaces while ensuring even heat distribution across entire patch area.
Apply firm downward pressure for 15-30 seconds moving iron slightly to distribute heat evenly across patch surface. Allow patches to cool completely before testing adhesion, reapplying heat to any loose edges ensuring complete bonding throughout patch perimeter.
Turn garments inside-out after initial application, ironing from reverse side to set adhesive thoroughly. This double-heat application maximizes bond strength particularly important for items requiring frequent washing or heavy wear.
Testing Patch Security
Check patch edges gently after cooling ensuring complete adhesion without gaps or lifting corners. Loose areas indicate insufficient heat or pressure requiring additional application before considering repair complete.
Wash patched items inside-out on gentle cycles after 24-hour curing periods allowing adhesives to set completely. This initial waiting period strengthens bonds before exposing patches to water and agitation stress.
Sew-On Patch Techniques
Hand-sewn patches offer superior durability and versatility working on fabrics unsuitable for heat application including delicate materials and leather. The permanent thread attachment withstands stress better than adhesives making sewn patches ideal for high-wear areas and frequently laundered items.
Basic Whip Stitch Method
Thread needles with matching or contrasting thread depending on desired visibility, securing patches with fabric clips before stitching. Begin from garment wrong side bringing needles through both layers near patch edges, wrapping thread over edges before inserting needles back through materials.
Continue around entire perimeters maintaining even stitch spacing approximately 1/4 inch apart for secure attachment. Close, consistent stitches prevent patch lifting while distributing stress evenly around edges reducing tear-out risk.
Invisible Stitch Application
Use thread matching patch colors for nearly invisible attachment working from garment undersides whenever possible. Take tiny stitches catching just few patch edge threads, keeping stitches small and consistent for professional invisible results.
This technique suits repairs where patch visibility should remain minimal, allowing functional repairs without obvious stitching lines. The concealed stitches maintain garment aesthetics while providing secure attachment comparable to visible stitching methods.
Decorative Stitching Options
Embrace visible stitching as design elements using contrasting thread colors and decorative stitch patterns including blanket stitch or chain stitch. These artistic approaches transform necessary repairs into intentional embellishments celebrating visible mending traditions.
Embroidery floss creates bold, textured stitching perfect for casual garments and creative projects. Multiple thread strands produce prominent stitching lines that become focal design features rather than hidden repair attempts.
Patching Denim and Heavy Fabrics
Denim requires specialized patching approaches due to its thickness and typical high-wear applications including workwear and children’s play clothes. Selecting appropriate patch materials and reinforcement techniques ensures repairs withstand the demanding conditions denim garments typically endure.
Knee and Elbow Reinforcement
Choose patches heavier than or matching original denim weight preventing inadequate reinforcement that fails under stress. Cut patches larger than damaged areas with rounded corners reducing lifting tendency at patch edges during movement.
Apply patches to both garment inside and outside for maximum strength in high-stress locations. This double-layer approach distributes forces across larger areas preventing concentrated stress that causes patch failure or additional fabric tearing.
Thread and Needle Selection
Use heavy-duty thread including upholstery weight or specialized denim thread for hand-sewing patches on thick materials. Standard sewing thread lacks sufficient strength for denim applications often breaking under tension before completing repairs.
Employ denim needles in sewing machines when machine-stitching patches, protecting equipment from damage while ensuring clean penetration through multiple fabric layers. Sharp, sturdy needles prevent skipped stitches and broken needles common when sewing thick materials with standard needles.
Pro Tip: Always cut patches with rounded corners rather than sharp angles. Rounded edges resist lifting and peeling far better than pointed corners which catch on objects and experience concentrated stress during movement.
Creative Patching Applications
Beyond functional repairs, fabric patches enable endless creative possibilities transforming plain garments into personalized fashion statements. Strategic patch placement and thoughtful design choices turn necessary repairs into artistic expressions while maintaining garment functionality.
Decorative Elbow Patches
Add leather or suede elbow patches to sweaters and jackets creating classic preppy aesthetics while reinforcing high-wear areas. These timeless additions combine functionality with style, protecting garment elbows while adding sophisticated visual interest to casual and professional clothing alike.
Contrasting fabric patches in complementary colors create modern takes on traditional elbow patches. Experiment with geometric shapes beyond standard ovals including hexagons or custom shapes that reflect personal style preferences.
Custom Character Designs
Position decorative patches on character fabrics avoiding key design elements while adding complementary embellishments. Strategic placement enhances rather than obscures printed designs creating cohesive custom looks that celebrate favorite characters or themes.
Layer multiple small patches creating collages or themed collections on jackets, backpacks, or tote bags. This accumulated approach builds visual interest over time, allowing style evolution as new patches join existing collections.
Pocket and Hem Accents
Reinforce pocket corners with small decorative patches preventing common tear-through at stress points while adding design details. Matching patches on multiple pockets creates coordinated looks that appear intentional rather than reactive to damage.
Apply patches along garment hems creating decorative bands that protect edges from fraying while updating styling. This technique proves especially effective on children’s clothing experiencing frequent hem wear from active play and growth-related lengthening alterations.
Maintaining Patched Garments
Proper care extends patch longevity ensuring repairs remain secure through multiple wear and wash cycles. Following recommended maintenance practices protects both patches and surrounding fabrics from premature deterioration or separation.
Washing Best Practices
Turn patched items inside-out before washing protecting patch surfaces from abrasion and excessive agitation. Use gentle wash cycles with cold or warm water avoiding harsh treatments that stress adhesive bonds or thread connections.
Avoid harsh detergents and bleach which may weaken adhesives or fade patch colors over time. Select mild detergents formulated for delicate fabrics when washing heavily patched items ensuring chemical gentleness preserves patch integrity.
Drying Considerations
Air-dry patched garments when possible eliminating heat exposure that may soften adhesives or cause shrinkage mismatches between patches and base fabrics. Hang or lay flat depending on garment type preventing weight-induced stretching in wet conditions.
If machine drying becomes necessary, use low heat settings and remove items promptly when dry. Extended heat exposure risks adhesive failure in iron-on patches while excessive tumbling may stress sewn patch edges.
Ironing Patched Areas
Iron patched garments from wrong sides using pressing cloths protecting patch surfaces from direct heat contact. This reverse-side approach allows fabric smoothing without risking adhesive re-melting or decorative surface damage from iron plates.
Reduce iron temperatures slightly when pressing near patches preventing overheating that may compromise adhesive bonds or melt synthetic patch materials. Test temperature settings on inconspicuous areas first when working with unfamiliar fabric and patch combinations.
Troubleshooting Common Issues
Understanding how to address patch problems saves garments from failure while building confidence in repair techniques. Most issues have straightforward solutions when identified early and addressed with appropriate methods.
Preventing Patch Lift
Patches lifting at edges indicate insufficient initial adhesion or inadequate heat application during iron-on installation. Reapply heat using pressing cloths ensuring complete bonding across entire patch perimeters before considering application complete.
For persistent lifting problems, reinforce iron-on patches with decorative stitching around edges. This hybrid approach combines adhesive convenience with sewn durability, creating maximum security particularly important for high-wear areas or frequently washed items.
Addressing Fabric Puckering
Fabric bunching around patches suggests excessive heat shrinking patch materials or base fabrics unevenly. Remove poorly applied patches and reapply with lower temperatures, using pressing cloths and lighter pressure to prevent material distortion.
For sewn patches causing puckering, tight stitching pulls fabrics creating gathered appearances. Remove stitches and reapply using looser thread tension, ensuring even distribution without excessive tightness that distorts surrounding materials.
Repairing Failed Patches
Remove failed patches carefully using seam rippers for sewn applications or heat application for iron-on types. Clean areas thoroughly removing adhesive residue or thread remnants before applying fresh patches to repaired sections.
Assess why original patches failed, adjusting techniques or materials for replacement attempts. Common failure causes include inadequate reinforcement, inappropriate patch weight, or insufficient application ensuring subsequent repairs address original shortcomings.
Sustainable Fashion Through Patching
Fabric patching embodies sustainable fashion principles extending garment lifecycles while reducing waste and consumption. This mindful approach challenges disposable culture promoting repair skills and appreciating clothing longevity over constant replacement cycles.
Environmental Benefits
Repairing damaged clothing rather than discarding prevents textile waste accumulation in landfills while reducing demand for new garment production. The fashion industry generates significant environmental impacts through manufacturing, making repair practices meaningful sustainability contributions accessible to individuals.
Utilizing fabric scraps from worn garments for patch materials further reduces waste while creating opportunities for creative reuse. This circular approach keeps materials in use longer maximizing their value before eventual disposal becomes necessary.
Building Repair Skills
Learning patching techniques develops valuable skills promoting self-sufficiency and reducing dependence on replacement consumption patterns. These practical abilities transfer across various repair needs beyond clothing including home textiles and accessories.
Sharing repair knowledge within communities strengthens social connections while promoting sustainable practices beyond individual actions. Repair workshops and skill exchanges build collective capacity for mindful clothing maintenance and creative reuse practices.
Frequently Asked Questions
Iron-on patches create durable bonds lasting through multiple wash cycles though they may eventually loosen with extended wear and frequent laundering. Proper application using adequate heat and pressure maximizes initial adhesion while following care instructions extends patch lifespan. For maximum permanence especially in high-wear areas, reinforce iron-on patches with stitching around edges combining adhesive convenience with sewn durability for repairs lasting years.
Yes, properly applied fabric patches withstand regular washing when garments are turned inside-out and washed on gentle cycles using cold or warm water. Avoid harsh detergents, bleach, and high heat which may weaken adhesive bonds or fade patch colors over time. Air-drying proves gentlest though low-heat machine drying works when necessary. Wait 24 hours after applying iron-on patches before first washing allowing adhesives to cure completely for maximum bond strength.
Natural fibers including cotton, linen, and cotton-blend fabrics accept iron-on patches most successfully due to their heat tolerance and absorbent structures allowing good adhesive penetration. Denim and canvas materials also work excellently with iron-on patches. Avoid applying heat-activated patches to delicate fabrics like silk, very stretchy knits, waterproof materials, or synthetic fabrics that may melt under required heat levels. Test adhesion on inconspicuous areas first when working with unfamiliar materials.
Remove iron-on patches by applying heat with an iron to soften adhesive, then gently peeling from one corner while adhesive remains warm. Treat stubborn residue with commercial adhesive removers or freeze garments making adhesive brittle for easier removal. For sewn patches, use seam rippers to carefully cut stitches working from wrong side when possible, pulling threads with tweezers as you progress. Both removal methods risk minor fabric damage requiring care and patience throughout the process.
Thin or worn fabrics benefit significantly from reinforcement before patch application preventing tear-through under stress. Add fusible interfacing or additional fabric layers behind damaged areas strengthening material structure before applying patches. Heavy-weight fabrics like denim typically accommodate patches without extensive reinforcement though adding support never hurts especially in high-stress locations. Reinforcement proves essential when repairing delicate materials or areas subjected to frequent pulling or weight-bearing loads.
Yes, fabric patches work excellently on jeans though denim’s thickness requires proper technique and materials for successful application. Use heavyweight patches matching or exceeding denim weight, applying to both inside and outside for maximum strength in knee or seat repairs. Heavy-duty thread and denim needles ensure secure attachment when sewing patches while adequate heat and pressure prove essential for iron-on applications. Reinforce high-stress areas with double-layer patching preventing premature failure in demanding wear conditions.
Properly applied sewn patches can last the entire remaining life of a garment when secured with quality thread and maintained according to care instructions. Iron-on patches typically endure 20-50 wash cycles depending on application quality, fabric compatibility, and washing practices before potentially loosening. Heavy-duty patches on reinforced areas in low-friction locations last longest while patches on high-wear areas like knees experience shorter lifespans. Hybrid approaches combining iron-on convenience with edge stitching maximize patch longevity across all applications.
Related Resources
- Fabric Scissors – Precision cutting tools
- Fabric Clips – Securing patches
- Fabric Chalk – Marking placement
- Fabric Pencil – Precise marking
- Fabric Iron – Heat application
- Canvas Fabric – Heavy-duty patches
- Fabric Adhesive – Alternative bonding
- Fabric Bags – Patching projects
- Harry Potter Fabric – Character designs
- Marvel Fabric – Themed patches
- Sewing Machines – Machine stitching
- Grommet Kit – Reinforcement hardware
- Fabric Ribbon – Decorative accents
- Black Friday Deals – Supply savings
Transform Damaged Clothing Into Renewed Favorites
Fabric patches offer practical solutions for extending garment lifecycles while providing creative opportunities for personal expression through decorative applications. Whether repairing children’s jeans or customizing jackets with artistic flair, proper patching techniques ensure professional results that withstand regular wear and washing.
Understanding the differences between iron-on and sew-on methods allows you to select appropriate approaches for specific fabrics and project requirements. From quick heat-activated fixes to durable hand-stitched repairs, patches accommodate various skill levels while promoting sustainable fashion practices.
Start your patching projects with quality materials, proper heat application tools, and reliable cutting implements transforming necessary repairs into opportunities for creativity and mindful clothing maintenance that challenges disposable culture.