
Fabric Photo Board: DIY Guide to Creating Custom Memory Displays
Step-by-Step Instructions for Making Decorative Photo Display Boards with Fabric, Ribbons, and Personal Style
Fabric photo boards transform cherished photographs and mementos into decorative wall displays using padded boards covered with beautiful fabric and crisscrossing ribbons. These customizable memory boards allow easy photo rotation without pins or adhesives damaging precious images while adding personalized style to any room.
Creating your own fabric photo board requires basic crafting skills and affordable materials including foam board, batting, fabric, and ribbon. The finished displays serve both functional and aesthetic purposes from organizing family memories to showcasing inspiration in creative workspaces.
Understanding Fabric Photo Board Design
Fabric photo boards feature padded surfaces wrapped in decorative fabric with ribbon strips crisscrossed to create diamond-shaped pockets. Photos, cards, and flat keepsakes slip behind ribbon intersections without requiring pins or tape that might damage materials.
The padded construction using batting or quilt filling creates dimensional texture while providing cushioned support for displayed items. This traditional French memo board design combines practicality with elegant appearance suitable for homes, offices, or dormitories.
Key Design Components
Base boards typically measure 16×20 to 24×36 inches made from foam board, cork board, or lightweight plywood providing stable mounting surfaces. Larger boards work well for extensive photo collections while smaller versions suit compact spaces or focused displays.
Batting layers add soft padding creating the characteristic puffy appearance and comfortable surface for items tucked behind ribbons. Low to medium loft batting works best avoiding excessive bulk that might interfere with ribbon placement.
Ribbon patterns form functional and decorative elements with standard diamond configurations spacing strips 4-6 inches apart. This arrangement creates pockets perfectly sized for standard 4×6 inch photos while providing enough secure points preventing items from slipping.
Advantages Over Traditional Bulletin Boards
Unlike cork boards requiring pins that puncture photographs, fabric photo boards hold items gently between ribbons preserving original condition. This gentle display method allows frequent rotation without cumulative damage from repeated pinning.
The decorative fabric covering transforms functional boards into attractive wall art complementing room décor rather than appearing utilitarian. Customizable fabric choices allow perfect matching with existing color schemes and design styles.
Essential Materials for DIY Fabric Photo Boards
Gathering quality materials ensures professional-looking results and long-lasting displays. Most supplies come from craft stores with total costs ranging $25-50 depending on size and material quality.
Base Board Options
Foam board provides lightweight, easy-to-work bases accepting staples readily and hanging simply on walls without heavy-duty hardware. The smooth surface prevents lumps showing through fabric while remaining affordable for multiple projects.
Cork board alternatives offer natural texture and slightly more rigidity though weighing more than foam options. These traditional bases work well when planning dual-purpose boards occasionally using pins alongside ribbon display.
Plywood boards deliver maximum durability and professional quality especially for large installations or high-traffic areas. The solid wood backing supports heavier items and withstands more handling though requiring power tools for cutting custom sizes.
Fabric Selection Guidelines
Medium-weight cotton fabrics including quilting cottons and cotton duck provide ideal combinations of body and workability. These materials stretch across boards smoothly without excessive sagging while accepting staples securely.
Linen and linen-blend fabrics create sophisticated, textured appearances adding visual interest to neutral color palettes. The natural fibers resist wrinkling and maintain crisp appearance even with frequent item changes.
Canvas materials suit rustic or casual design aesthetics offering substantial weight and durability. The heavier construction works particularly well for boards receiving frequent use or displaying heavier memorabilia.
Ribbon and Trim Choices
Grosgrain ribbon provides classic texture with horizontal ridges creating sophisticated appearance and excellent grip for holding items. Widths between 5/8 to 1 inch work best balancing visibility with functional holding power.
Satin ribbons offer elegant, lustrous finishes suited to formal spaces or elegant design themes. The smooth surface reflects light beautifully though providing slightly less friction than textured grosgrain alternatives.
Farmlyn Creek Fabric Bulletin Board
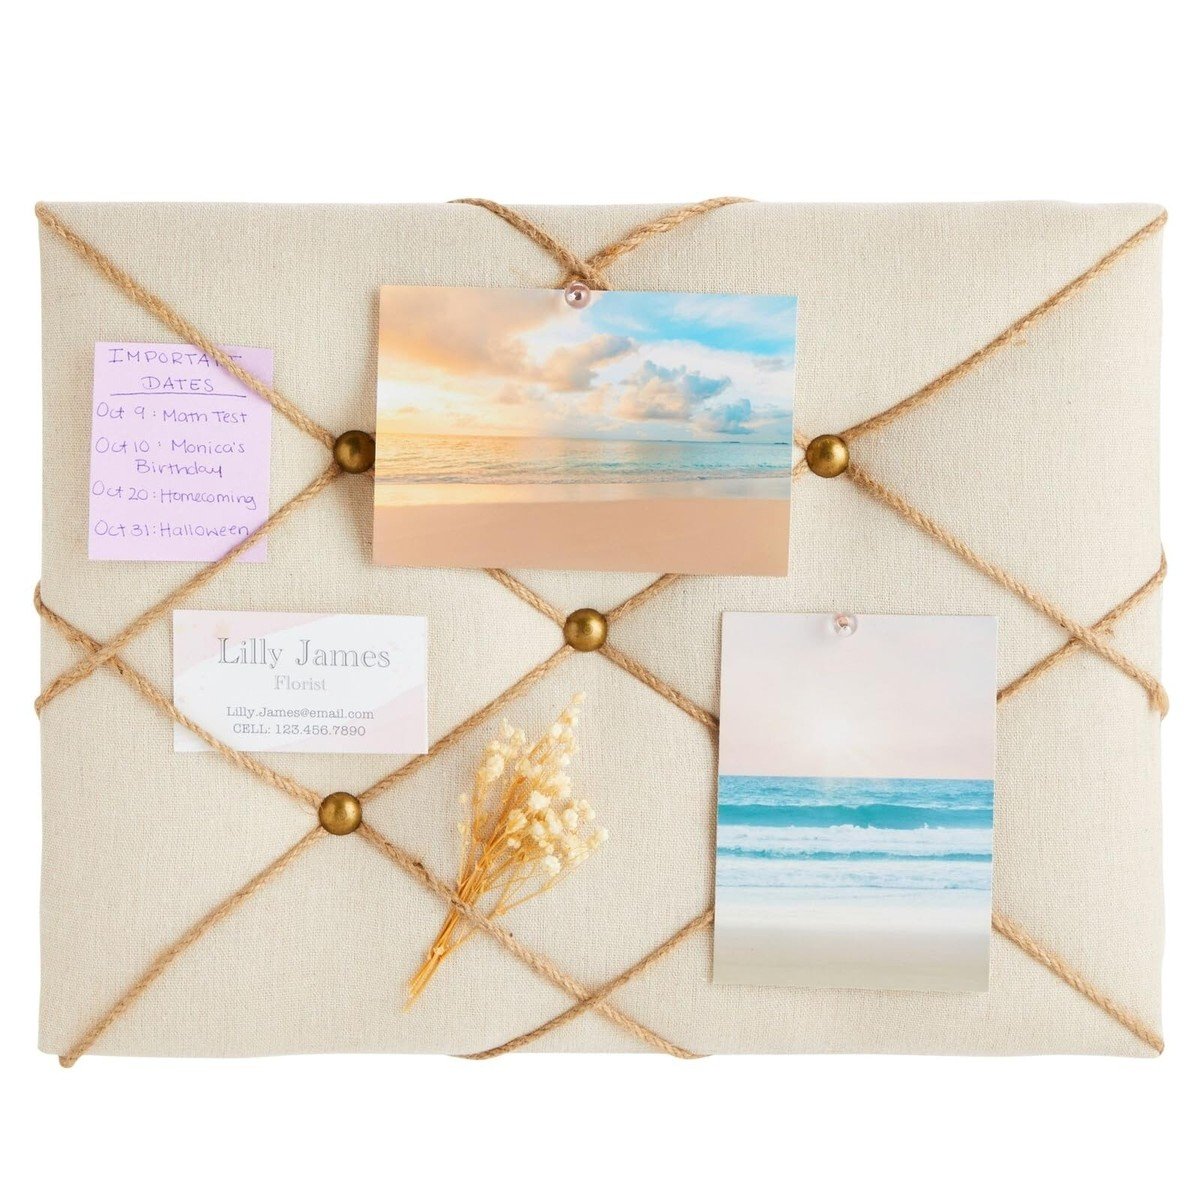
Natural beige linen fabric bulletin board measuring 16×12 inches designed specifically for photo displays and wall organization in offices, bedrooms, and kitchens. This versatile decorative piece features neutral linen fabric creating sophisticated backdrop for showcasing cherished photographs, artwork, quotes, and important reminders while seamlessly complementing any room’s aesthetic design. The functional push pin board construction allows personalized displays that organize visual memories and inspiration creating customized spaces reflecting individual style and important life moments.
- 16×12 inch display size
- Natural beige linen fabric
- Neutral decorative design
- Photo and artwork display
- Wall mounting capability
- Bedroom and office use
- Personalized organization
SOFE Fabric Bulletin Board
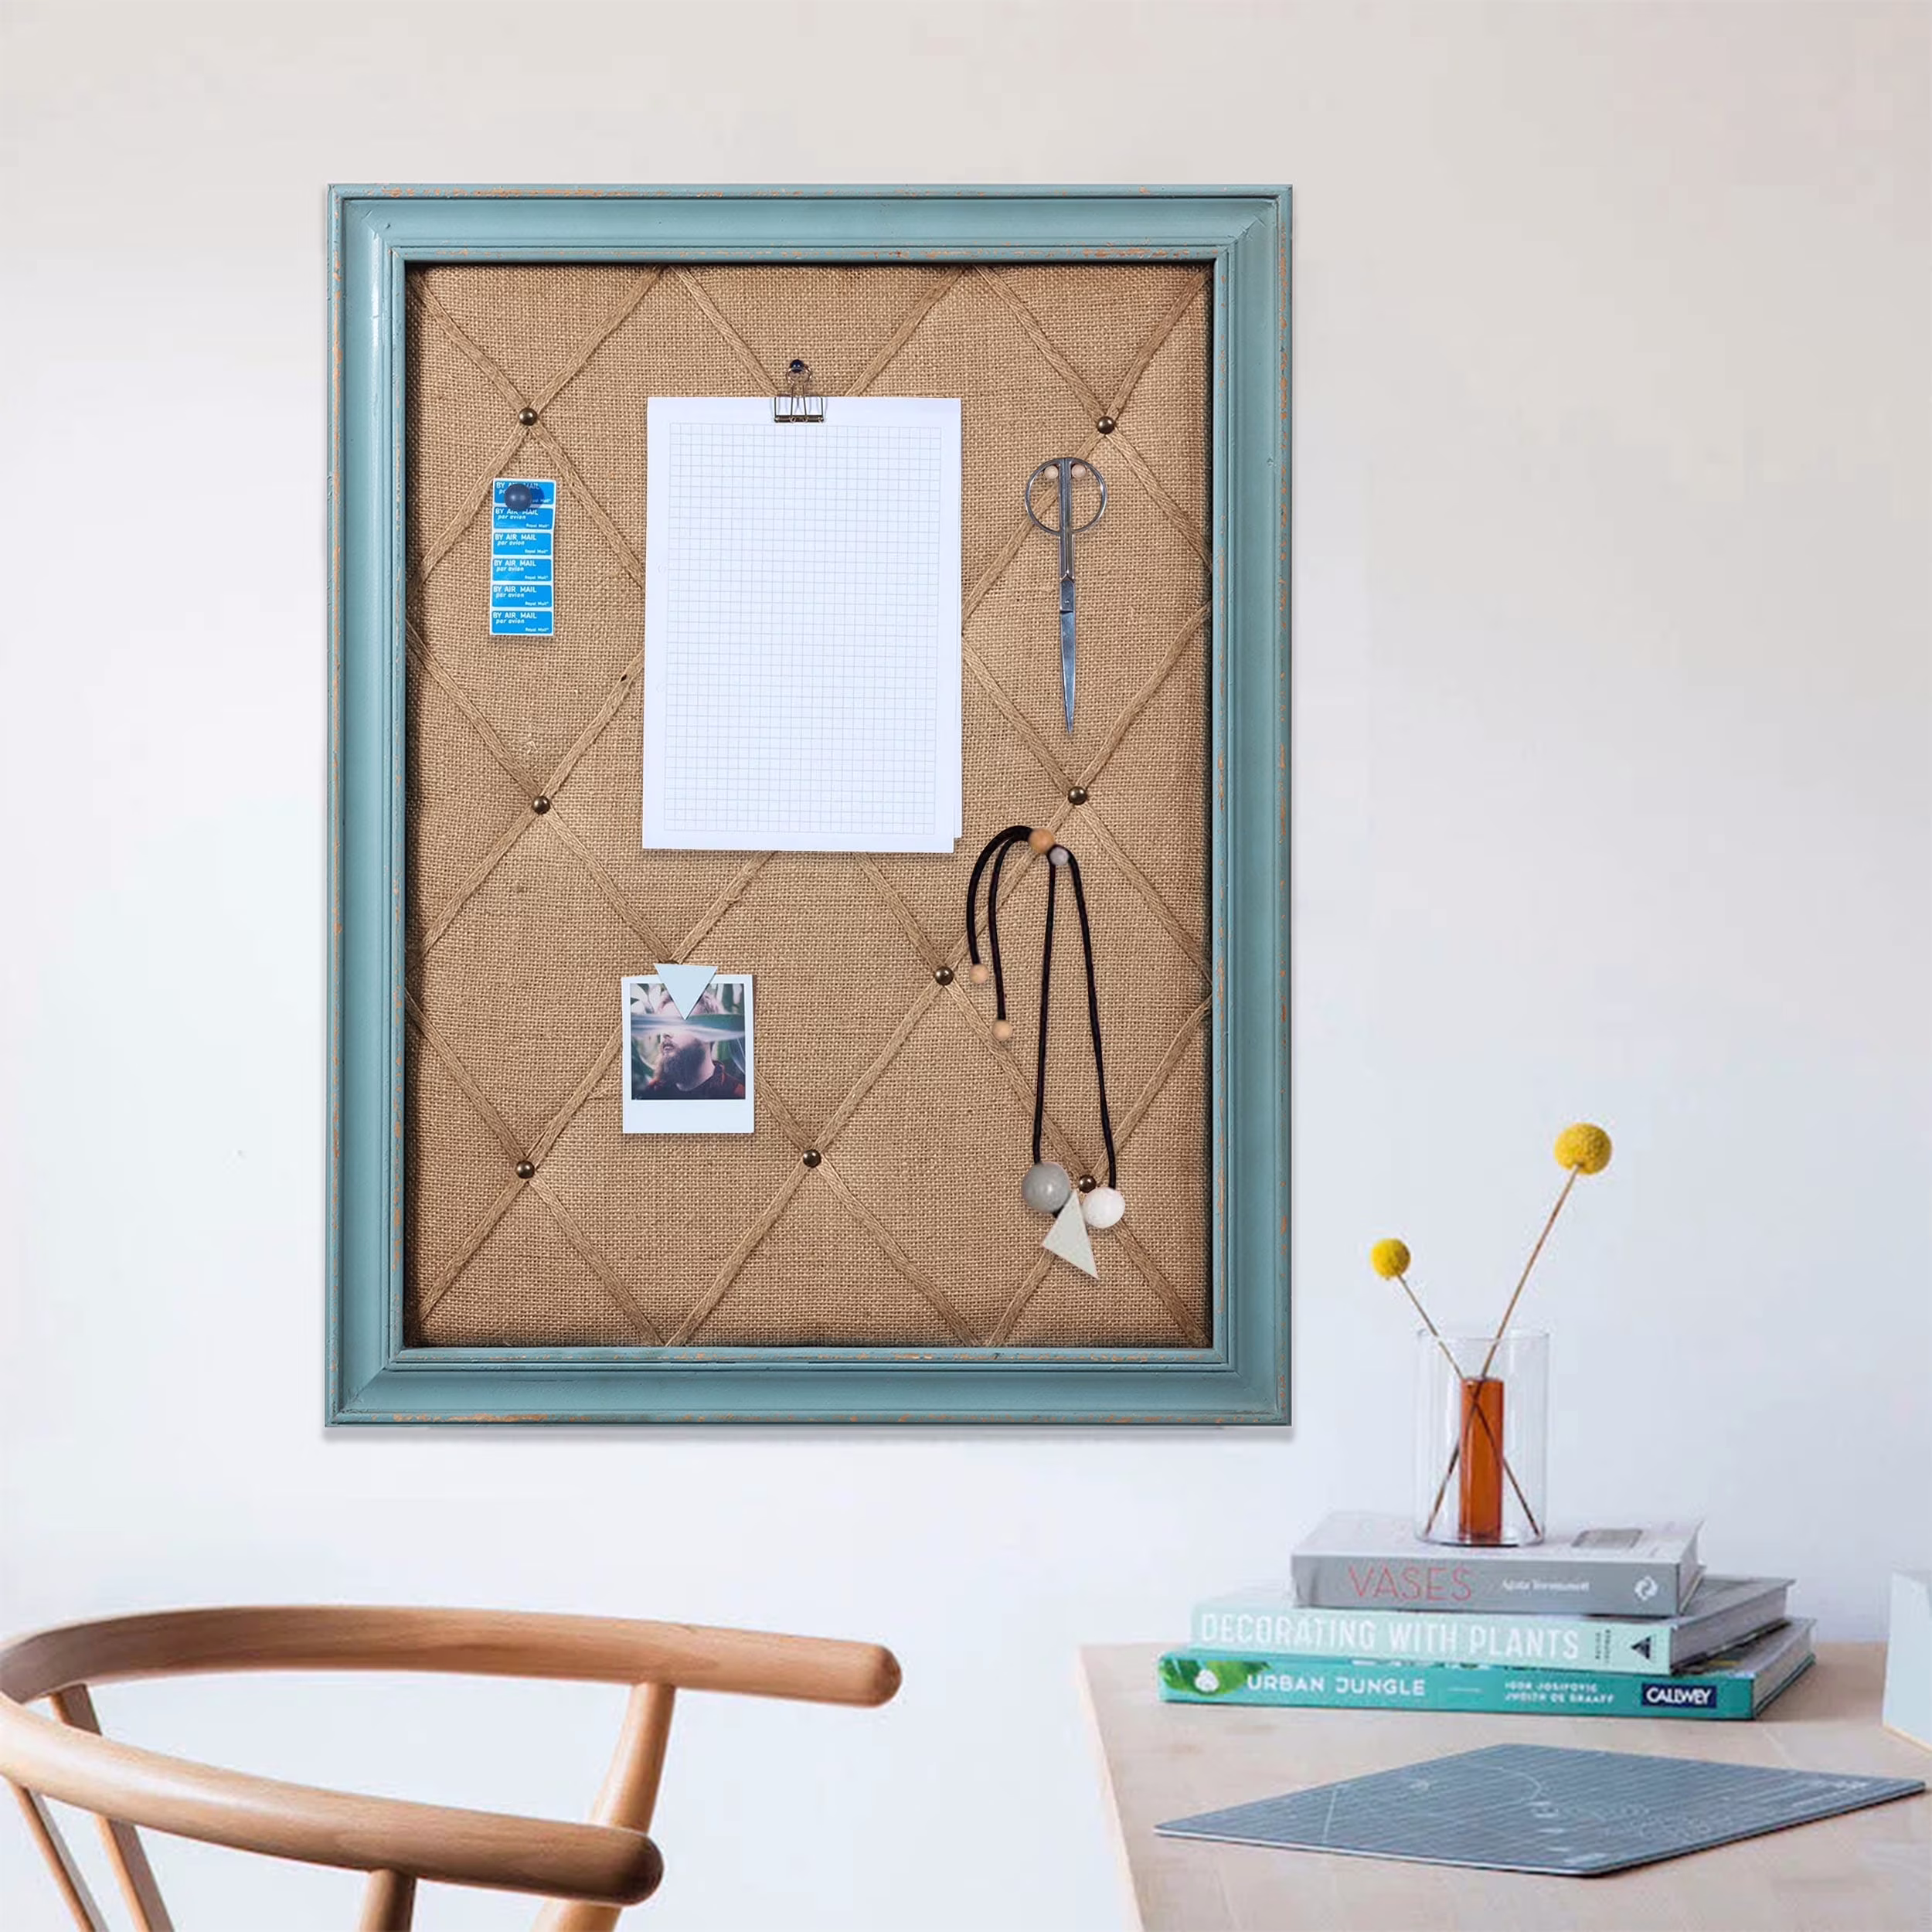
Large 21×27 inch fabric bulletin board featuring rustic blue wooden frame and burlap covering with crisscross twine creating classic memo board functionality for walls. This decorative vision board combines rustic energy with practical organization using burlap material covered with intersecting twine allowing repeated use for photo displays, notes, and messages without effort. The pinboard wall organizer serves multiple purposes from family command centers to creative workspace inspiration maintaining attractive appearance while providing functional note and message organization for busy households and offices.
- 21×27 inch large size
- Rustic blue wooden frame
- Burlap fabric covering
- Crisscross twine design
- Reusable memo board
- Easy pin installation
- Decorative wall organizer
- Vision board capability
Step-by-Step Construction Process
Creating fabric photo boards requires careful attention to detail during each construction phase ensuring smooth, professional-looking finished products. Working methodically through these steps produces displays worthy of gifting or selling.
Preparing Your Board Base
Cut base boards to desired dimensions using sharp craft knives for foam board or saws for wood options. Standard sizes include 16×20, 18×24, or 24×36 inches though custom dimensions accommodate specific spaces.
Sand wooden board edges removing splinters and rough spots that might snag fabric or batting during assembly. Smooth edges also create cleaner finished appearance when viewing boards from angles.
Adding Batting Layers
Cut batting pieces 3-4 inches larger than board dimensions on all sides allowing adequate material for wrapping around edges. Position batting centered over board front ensuring even overhang around entire perimeter.
Flip assembly batting-side down and staple batting to board back starting at center points of each side. Work outward toward corners pulling batting taut without stretching while stapling every 2-3 inches along edges.
Fold corners neatly using gift-wrap technique bringing one side in first then overlapping second side at 45-degree angles. Secure corner folds with additional staples creating clean, flat backs without excess bulk.
Applying Decorative Fabric
Press fabric thoroughly removing all wrinkles that would show through finished board surface. Lay fabric face-down on clean work surface positioning padded board batting-side down centered on fabric.
Pull fabric taut across board back stapling at center points of each side first establishing even tension. Continue stapling outward toward corners maintaining consistent pull preventing wrinkles or sagging areas showing on front.
Create neat corner folds matching batting technique ensuring no raw fabric edges show when viewing completed board. Trim excess fabric and batting from back leaving 1-2 inches beyond staples for security.
Installing Ribbon Pattern
Plan ribbon placement by laying strips loosely across board front adjusting spacing until achieving desired diamond or grid pattern. Mark ribbon positions lightly on board edges using pencil for consistent placement.
Cut ribbon lengths extending 3-4 inches beyond board edges on each end allowing adequate material for wrapping and stapling. Position first ribbon following marks pulling taut before flipping board to staple back ends securely.
Continue adding ribbons following planned pattern ensuring even spacing and consistent tension across all strips. Where ribbons cross, consider adding decorative buttons or tacks securing intersections while adding visual interest.
Creative Customization Options
Personalizing fabric photo boards allows perfect matching with room décor and individual style preferences. Thoughtful customization transforms basic boards into unique statement pieces.
Fabric Pattern Selection
Solid fabrics in coordinating room colors create clean, sophisticated backgrounds allowing photos to remain focal points. Neutral tones including beige, gray, or soft white suit versatile styling working with changing décor.
Subtle patterns including small dots, stripes, or geometric prints add visual texture without overwhelming displayed photographs. Scale patterns appropriately ensuring designs complement rather than compete with ribbon arrangements.
Themed fabrics reflecting personal interests transform boards into cohesive design statements from nautical stripes to floral gardens. Consider how fabric choices affect overall room aesthetics and photo visibility.
Ribbon Color Combinations
Monochromatic ribbon schemes using single colors create elegant, unified appearances suitable for formal spaces. Choose ribbon shades slightly darker or lighter than fabric for subtle contrast defining diamond shapes.
Complementary color pairings add vibrant interest to neutral fabric backgrounds making boards pop as decorative focal points. Test color combinations beforehand ensuring harmonious results matching room palettes.
Metallic ribbons in gold, silver, or copper finishes elevate designs adding glamorous touches perfect for special occasion boards. The reflective surfaces catch light beautifully creating dimensional visual effects.
Decorative Embellishment Ideas
Fabric-covered buttons at ribbon intersections provide classic finishing touches while securing ribbon placement. Select button sizes proportional to ribbon width avoiding overwhelming small boards with oversized embellishments.
Decorative thumbtacks or upholstery nails create metallic accents offering modern industrial aesthetics. The functional hardware doubles as design elements particularly effective in contemporary or minimalist spaces.
Pro Tip: Test your fabric and ribbon combination by creating a small sample board first. This allows experimentation with tension, spacing, and color coordination before committing to full-size projects, preventing costly material waste.
Practical Display Applications
Fabric photo boards serve numerous purposes beyond simple photograph display adapting to various organizational and decorative needs throughout homes and workspaces.
Memory and Photo Organization
Family photo displays showcase special moments from vacations, celebrations, and everyday life rotating seasonally to keep displays fresh. The easy-change design encourages regular updates maintaining current family documentation.
Travel memory boards collect ticket stubs, postcards, and destination photos creating visual journals of adventures. Arrange items chronologically or thematically telling stories through curated displays.
Workspace Inspiration Boards
Creative studios benefit from inspiration boards displaying fabric swatches, color palettes, and design sketches. The ribbon system allows easy rearrangement supporting evolving project development and brainstorming sessions.
Office organization boards hold business cards, project timelines, and motivational quotes maintaining professional productivity. Position boards at eye level in workspaces providing convenient reference without cluttering desk surfaces.
Special Event Documentation
Wedding planning boards organize invitation samples, venue photos, and vendor information streamlining coordination efforts. After events, transform boards into memory displays featuring ceremony photos and special mementos.
Baby shower and nursery boards track milestone photos and well-wishes creating touching keepsakes documenting early childhood. Update displays as babies grow maintaining relevant developmental documentation.
Room-Specific Design Considerations
Tailoring fabric photo boards to specific room functions and aesthetics ensures seamless integration with existing décor while maximizing practical utility.
Home Office Designs
Professional spaces require sophisticated color palettes in neutral tones or muted jewel shades maintaining focused work environments. Choose quality fabrics with subtle textures adding visual interest without distraction.
Coordinate board designs with office furniture and wall colors ensuring cohesive professional appearance. Consider positioning boards near desks or above filing cabinets for convenient access to displayed information.
Children’s Room Adaptations
Durable, washable fabrics withstand active household environments where boards might receive rougher handling. Select playful patterns and bright colors matching children’s preferences while maintaining age-appropriate sophistication.
Position boards at appropriate heights allowing children independent access for rotating their own artwork and photos. Lower placements encourage ownership and regular interaction with displayed materials.
Kitchen and Entryway Organization
High-traffic areas benefit from wipeable fabrics or protective fabric treatments resisting stains and moisture. Display recipe cards, shopping lists, and family calendars maintaining household organization.
Seasonal decoration boards in entryways showcase holiday cards and festive imagery welcoming guests with personalized touches. Rotate displays throughout the year reflecting current celebrations and occasions.
Advanced Construction Techniques
Experienced crafters can explore sophisticated variations elevating basic fabric photo boards into professional-quality installations.
Framed Photo Board Designs
Adding wooden frames around fabric boards creates gallery-quality presentations suitable for formal living spaces. Source frames from thrift stores or build custom frames using decorative molding and corner joints.
Paint or stain frames coordinating with room woodwork and furniture ensuring integrated appearance. Attach fabric boards within frames using appropriate hardware maintaining secure mounting while allowing future updates.
Multi-Panel Installations
Create dramatic wall displays using multiple coordinating boards arranged in groupings of three or more. Vary sizes slightly maintaining visual interest while providing expanded display capacity.
Coordinate fabric choices across panels using complementary colors or patterns that create cohesive collections. Maintain consistent ribbon colors and spacing ensuring unified appearance despite individual board variations.
Magnetic Hybrid Boards
Combine fabric board aesthetics with magnetic functionality using galvanized steel base sheets instead of traditional foam or cork. Cover metal bases with batting and fabric as usual creating boards accepting both ribbon-held and magnetic items.
This dual-purpose design expands display options allowing mix of photographs behind ribbons and magnetically attached notes or lightweight decorations. The versatility suits busy households needing flexible organization systems.
Maintenance and Care
Proper maintenance extends fabric photo board lifespan keeping displays looking fresh and functional through years of use.
Regular Cleaning Methods
Dust fabric surfaces weekly using soft cloths or vacuum attachments with upholstery brushes preventing accumulation that dulls appearance. Gentle cleaning maintains fabric texture and color without damaging ribbon attachments.
Address stains immediately using mild fabric cleaners tested first on inconspicuous areas ensuring color-fastness. Blot rather than rub stained areas preventing damage to fabric weave or batting underneath.
Long-Term Preservation
Rotate displayed photographs periodically preventing uneven fading from sunlight exposure particularly on boards near windows. Store removed photos properly maintaining archival quality for future rotation.
Tighten ribbon tension if sagging develops over time by carefully removing and restapling affected sections. Maintain even tension across all ribbons ensuring consistent appearance and reliable item holding.
Apply fabric protector sprays designed for upholstery creating stain-resistant barriers especially important for light-colored fabrics. Follow product instructions carefully ensuring even coverage without discoloration.
Frequently Asked Questions
Medium-weight cotton fabrics including quilting cottons and cotton duck provide ideal combinations of body, workability, and durability for photo boards. These materials stretch smoothly across board surfaces without excessive sagging while accepting staples securely. Linen and linen-blend fabrics create sophisticated textured appearances perfect for formal spaces. Avoid stretchy knits that sag over time and very lightweight fabrics like silk that may tear at staple points.
Photos slip behind ribbon intersections on fabric boards without requiring pins or adhesives that damage images. Position photo corners behind crossing ribbon points allowing ribbons to hold items securely against padded surface. For extra security, tuck all four corners behind different ribbon sections or use small photo corners slipped under ribbons. This gentle holding method allows easy rotation while preserving photograph condition through repeated display changes.
Standard fabric photo board sizes range from 16×20 inches for compact displays to 24×36 inches for statement pieces accommodating extensive photo collections. Consider available wall space and intended use when selecting dimensions. Smaller boards suit desk areas or tight spaces while larger versions work well as focal points in living rooms or offices. Multiple smaller boards arranged together provide flexible alternatives to single large installations.
Fabric photo boards require spot cleaning rather than full washing since construction involves permanently attached batting and stapled fabric. Clean surface fabrics using mild upholstery cleaners and damp cloths blotting stains gently. Test cleaning products on inconspicuous areas first ensuring color-fastness. For dusty boards, vacuum gently using upholstery attachments. Apply fabric protector sprays during construction for easier maintenance especially when using light-colored fabrics prone to showing dirt.
Ribbon requirements depend on board size and desired pattern density. For standard 18×24 inch boards with diamond patterns spacing ribbons 4-6 inches apart, plan for approximately 4-5 yards total ribbon. Measure board dimensions adding several extra inches per strip for wrapping and stapling on back. Purchase extra ribbon accounting for pattern adjustments and potential mistakes during installation. Wider boards or tighter spacing patterns require proportionally more ribbon.
Foam board provides lightweight, easy-to-work backing accepting staples readily while hanging simply without heavy hardware. Cork board offers natural texture with more rigidity though weighing slightly more. Plywood delivers maximum durability and professional quality especially for large installations or high-traffic areas. Choose backing based on board size, intended location, and construction skill level. Foam board suits beginners while experienced crafters might prefer plywood’s substantial feel.
Attach sawtooth hangers to board backs for lightweight installations under 20×20 inches providing simple wall mounting. Larger or heavier boards require D-rings and picture wire distributing weight more evenly across mounting points. Position hanging hardware carefully ensuring boards hang level when mounted. Use appropriate wall anchors if mounting locations lack studs supporting board weight plus displayed items. For rental spaces, consider command strips rated for appropriate weights avoiding wall damage.
Create Personalized Memory Displays
Fabric photo boards transform ordinary photograph storage into beautiful, functional wall art celebrating life’s important moments and memories. The customizable construction allows perfect coordination with any décor style while providing gentle display methods preserving photograph quality.
Whether creating organizational tools for busy households or decorative statements for living spaces, fabric photo boards offer versatile solutions combining practicality with personal expression. The straightforward construction process makes these projects accessible to crafters of all skill levels.
Start your fabric photo board project today gathering quality materials and planning designs that reflect your unique style and display needs, creating lasting pieces showcasing what matters most in your daily environment.